syzkaller internals: architecture
TOC
- TOC
- Overview
- syz-manager <—> VM
- syz-manager —> syz-fuzzer
- syz-manager <— syz-fuzzer
- syz-fuzzer <—> syz-executor
- syz-executor
Overview
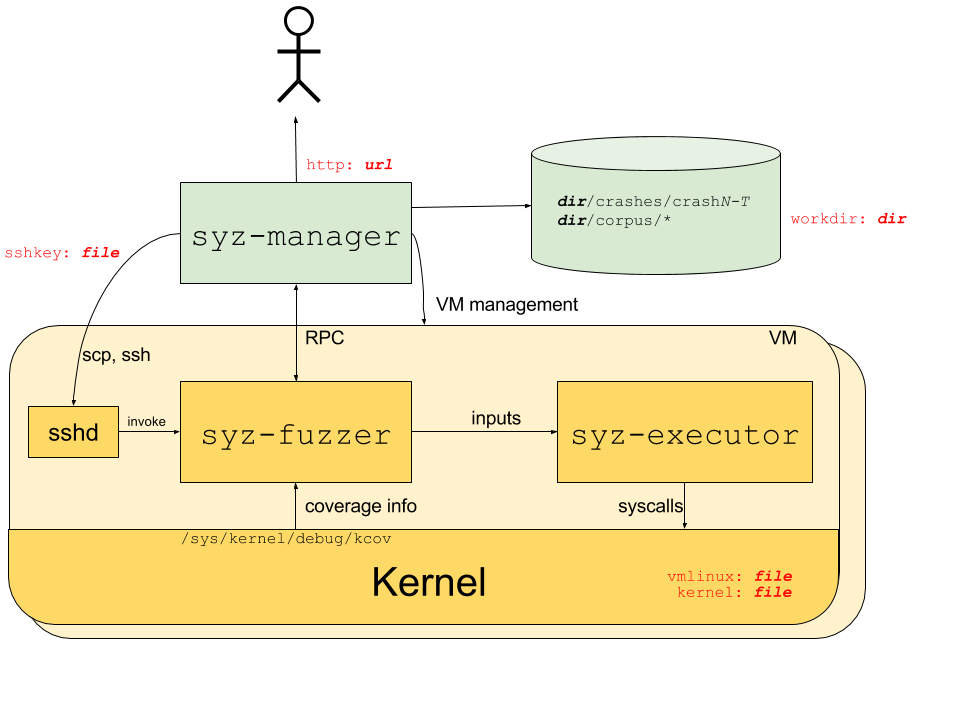
官方文档已经描述得比较详细,这里直接摘抄过来:
- The syz-manager process starts, monitors and restarts several VM instances, and starts a syz-fuzzer process inside of the VMs. syz-manager is responsible for persistent corpus and crash storage. It runs on a host with stable kernel which does not experience white-noise fuzzer load.
- The syz-fuzzer process runs inside of presumably unstable VMs. The syz-fuzzer guides fuzzing process (input generation, mutation, minimization, etc.) and sends inputs that trigger new coverage back to the syz-manager process via RPC. It also starts transient syz-executor processes.
- Each syz-executor process executes a single input (a sequence of syscalls). It accepts the program to execute from the syz-fuzzer process and sends results back. It is designed to be as simple as possible (to not interfere with fuzzing process), written in C++, compiled as static binary and uses shared memory for communication.
| 接下来简要分析各个模块之间的关系,本文的目的是暂时去掉多余的细节,把各个组件之间管理与通信的实现细节抽离出来,方便和我一样的初学者快速理解。本文假设读者已经搭建 syzkaller 所需环境并成功运行。本文假设 syzkaller 目标配置为 qemu, amd64, linux。 |
syz-manager <—> VM
在 syz-manager 中,用 Manager 结构体来记录与 fuzzing 相关的数据,cfg 字段代表了启动 syz-manager 所提供的配置文件的相关配置。在 main 函数中首先就会通过 mgrconfig.LoadFile() 来从配置文件中载入配置,初始化 cfg 字段。载入配置文件后,首先会在 RunManager() 中调用 vm.Create() -> typ.Ctor() 创建 vmPool,其中 impl 指向代表了具体 vm 实现的结构体(例如 qemu,kvm 等),从名字可以看出这是一个用于管理 vm 的实例,其包含一个 Pool.Create() 函数,之后用来创建 instance 实例。Pool 也有一个字段名叫 cfg,他的数据是在 typ.Ctor() 中解析配置文件的 vm 字段而来的。
/*
       +----------------------------+
       |type Manager struct {       |
  +----+ cfg       *mgrconfig.Config|
  |    | vmPool    *vm.Pool         |
  |    | ...                        |
  |    |}                           |
  |    +----------------------------+
  |
  |    +----------------------------+
  +--->+type Pool struct {          |
       | impl     vmimpl.Pool       +----+
       | ...                        |    |
       |}                           |    |
       +----------------------------+    |
                                         |
       +----------------------------+    |
       |type Pool struct {          +<---+
  +----+ env        *vmimpl.Env     |
  |    | cfg        *Config         |
  |    | ...                        |         +----------+
  |    | Create()                   +-------->+ instance |
  |    |}                           |         +----------+
  |    +----------------------------+
  |
  |    +----------------------------+
  +--->+type Env struct {           |
       | Name          string       |
       | OS            string       |
       | ...                        |
       | DebugFuzzer   bool         |
       |}                           |
       +----------------------------+
*/

func Create(cfg *mgrconfig.Config, debug bool) (*Pool, error) {
    env := &vmimpl.Env{
        Name:     cfg.Name,
        OS:       cfg.TargetOS,
        ...
    }
    impl, err := typ.Ctor(env)
    if err != nil {
        return nil, err
    }
    return &Pool{
        impl:     impl,
        workdir:  env.Workdir,
        template: cfg.WorkdirTemplate,
        timeouts: cfg.Timeouts,
    }, nil
}

func ctor(env *vmimpl.Env) (vmimpl.Pool, error) {
    archConfig := archConfigs[env.OS+"/"+env.Arch]
    cfg := &Config{
        ...
    }
    if err := config.LoadData(env.Config, cfg); err != nil {
        return nil, fmt.Errorf("failed to parse qemu vm config: %v", err)
    }
    ...
    pool := &Pool{
        env:        env,
        cfg:        cfg,
        ...
    }
    return pool, nil
}
之后会进入 vmLoop() 函数,通过 for 循环来持续启动 vm 实例。其中使用 instances 数组来维护可用的 instance 数量。有三种情况会往 instances 里 append:
- 在程序初次运行时,会通过 bootInstance channel 来控制按一定速率往 instances 里 append。
- 当 vm crash 过后会往 isntances 里 append。
- 当 repro 过程结束后。 (此 instance 生命周期结束,crash 相关之后再补充)
当发现 instances 数组长度大于 0,即有可用 instance 时,就会调用 mgr.runInstance() 来运行一个实例。
func (mgr *Manager) vmLoop() {
    vmCount := mgr.vmPool.Count()
    bootInstance := make(chan int)
    go func() {
        for i := 0; i < vmCount; i++ {
            bootInstance <- i           // <===[1]
            time.Sleep(10 * time.Second * mgr.cfg.Timeouts.Scale)
        }
    }()
    var instances []int
    for shutdown != nil || len(instances) != vmCount {
        if shutdown != nil {
            for !canRepro() && len(instances) != 0 {
                last := len(instances) - 1
                idx := instances[last]
                instances = instances[:last]
                log.Logf(1, "loop: starting instance %v", idx)
                go func() {
                    crash, err := mgr.runInstance(idx)
                    runDone <- &RunResult{idx, crash, err}
                }()
            }
        }

        select {
        case idx := <-bootInstance:   // <===[1]
            instances = append(instances, idx)
        case res := <-runDone:
            log.Logf(1, "loop: instance %v finished, crash=%v", res.
            instances = append(instances, res.idx)  // <===[2]
            if shutdown != nil && res.crash != nil {
				needRepro := mgr.saveCrash(res.crash)
				if needRepro {
					log.Logf(1, "loop: add pending repro for '%v'", res.crash.Title)
					pendingRepro[res.crash] = true
				}
			}
        case res := <-reproDone:
            log.Logf(1, "loop: repro on %+v finished '%v', repro=%v crepro=%v desc='%v'",
                res.instances, res.report0.Title, res.res != nil, crepro, title)
            delete(reproducing, res.report0.Title)
            instances = append(instances, res.instances...) // <===[3]
        }
    }
}
会根据之前创建的 vmPool,通过调用链 runInstance() -> runInstanceInner() -> mgr.vmPool.Craete() -> pool.impl.Create() 调用到不同类型 vm 实现的 Create() 函数用于创建 instance 实例。qemu 主要在 Create() 中重复尝试调用 ctor() 来创建虚拟机实例,每个实例数据都由 instance 结构体来维护,记录了当前实例的一些参数和配置,可以看到配置文件中针对 vm 的配置信息会通过 cfg 进行记录,而其他的配置信息则是通过 pool.env 进行传递。
ctor() 中简单的初始化这个结构体,然后进入 inst.boot() 完成具体的启动流程。inst.boot() 则是根据配置信息对 qemu 的启动参数进行构造,然后将启动命令 Command 的 stdout 和 stderr 重定向到管道,以便当 boot 失败时,获得失败的原因;此外 stdout,stderr 对应管道的读端会加入到 inst.merger 中,便于之后对 qemu 运行状态的监控。最后会通过 WaitForSSH() 来检验虚拟机是否正常启动,其内部通过 ssh 来控制虚拟机执行一次 pwd 命令。
type instance struct {
	index         int
	cfg           *Config
	debug         bool
	sshkey        string
	sshuser       string
	rpipe         io.ReadCloser
	wpipe         io.WriteCloser
    ...
    Copy()
    Run()
    ...
}

func (pool *Pool) Create(workdir string, index int) (vmimpl.Instance, error) {
    ...
	for i := 0; ; i++ {
		inst, err := pool.ctor(workdir, sshkey, sshuser, index)
		if err == nil {
			return inst, nil
		}
        ...
	}
}

func (pool *Pool) ctor(workdir, sshkey, sshuser string, index int) (vmimpl.Instance, error) {
	inst := &instance{
		index:         index,
		cfg:           pool.cfg,
		image:         pool.env.Image,
		debug:         pool.env.Debug,
        ...
	}
	var err error
	inst.rpipe, inst.wpipe, err = osutil.LongPipe()
    ...
	if err := inst.boot(); err != nil {
		return nil, err
	}
    ...
}


func (inst *instance) boot() error {
	args := []string{
		"-m", strconv.Itoa(inst.cfg.Mem),
		"-smp", strconv.Itoa(inst.cfg.CPU),
		"-chardev", fmt.Sprintf("socket,id=SOCKSYZ,server=on,nowait,host=localhost,port=%v", inst.monport),
        ...
	}
	if inst.cfg.Initrd != "" {
		args = append(args,
			"-initrd", inst.cfg.Initrd,
		)
	}
    ...
	inst.args = args
	qemu := osutil.Command(inst.cfg.Qemu, args...)
	qemu.Stdout = inst.wpipe
	qemu.Stderr = inst.wpipe
	if err := qemu.Start(); err != nil {
		return fmt.Errorf("failed to start %v %+v: %v", inst.cfg.Qemu, args, err)
	}
	inst.qemu = qemu
    inst.merger = vmimpl.NewOutputMerger(tee)
	inst.merger.Add("qemu", inst.rpipe)
    ...
	if err := vmimpl.WaitForSSH(inst.debug, 10*time.Minute*inst.timeouts.Scale, "localhost",
		inst.sshkey, inst.sshuser, inst.os, inst.port, inst.merger.Err); err != nil {
		return vmimpl.MakeBootError(err, bootOutput)
	}
	bootOutputStop <- true
	return nil
}
之后 manager 对于 vm 的控制就通过 instance 提供的 API 来完成。vm 的输出被加入到了 inst.merger 中,对于 vm 运行状态的监控主要是通过解析 output,之后 syz-fuzzer 的输出也会加入到 inst.merger 中,状态监控是在一起的,所以这一点后面再讲。
syz-manager —> syz-fuzzer
上一节提到 runInstanceInner() 中调用 mgr.vmPool.Create() 来创建 vm 实例,在创建实例之后就会通过 inst.Copy() 把 syz-fuzzer 和 syz-executor 拷贝进虚拟机中,对于 qemu 这个过程是通过 scp 命令实现的。
之后调用 instance.FuzzerCmd() 构造 syz-fuzzer 的启动参数,大多是根据 cfg 解析生成的,需要关注的主要是 fwdAddr 参数,其为 manager 启动 RPC 服务的地址。syz-fuzzer 和 syz-manager 主要通过 RPC 进行通信。
紧接着调用 inst.Run() 启动 syz-fuzzer,在 qemu 中使用 ssh 实现。用管道替换 cmd 的 stdout 和 stderr,同样的也将管道的读端加入 inst.merger,方便对 syz-fuzzer 的运行状态进行监控,然后返回 inst.merger.Output(包含了 qemu 和 ssh 的输出);此外还创建了一个 errc 管道,运行了一个线程对 ssh 命令的错误和特殊情况进行处理,如果需要中止命令则调用 signal 往 errc 管道发送数据。最后将 inst.merger.Output 和 errc 一并传入 MonitorExecution(),对 vm 和 fuzzer 运行状态进行监控。
func (mgr *Manager) runInstanceInner(index int, instanceName string) (*report.Report, []byte, error) {
    inst, err := mgr.vmPool.Create(index)
    defer inst.Close()

    fwdAddr, err := inst.Forward(mgr.serv.port)
    fuzzerBin, err := inst.Copy(mgr.cfg.FuzzerBin)

    executorBin := mgr.sysTarget.ExecutorBin
    if executorBin == "" {
        executorBin, err = inst.Copy(mgr.cfg.ExecutorBin)
    }
    ...

    // Run the fuzzer binary.
    cmd := instance.FuzzerCmd(fuzzerBin, executorBin, instanceName,
        mgr.cfg.TargetOS, mgr.cfg.TargetArch, fwdAddr, mgr.cfg.Sandbox, procs, fuzzerV,
        mgr.cfg.Cover, *flagDebug, false, false, true, mgr.cfg.Timeouts.Slowdown)
    outc, errc, err := inst.Run(mgr.cfg.Timeouts.VMRunningTime, mgr.vmStop, cmd)
    ...

    var vmInfo []byte
    rep := inst.MonitorExecution(outc, errc, mgr.reporter, vm.ExitTimeout)
    ...

    return rep, vmInfo, nil
}

func (inst *instance) Run(timeout time.Duration, stop <-chan bool, command string) (
	<-chan []byte, <-chan error, error) {
	rpipe, wpipe, err := osutil.LongPipe()
	inst.merger.Add("ssh", rpipe)
    ...
	sshArgs := vmimpl.SSHArgsForward(inst.debug, inst.sshkey, inst.port, inst.forwardPort)
	args := strings.Split(command, " ")
	if bin := filepath.Base(args[0]); inst.target.HostFuzzer &&
		(bin == "syz-fuzzer" || bin == "syz-execprog") {
        ...
	} else {
		args = []string{"ssh"}
		args = append(args, sshArgs...)
		args = append(args, inst.sshuser+"@localhost", "cd "+inst.targetDir()+" && "+command)
	}
    ...
	cmd := osutil.Command(args[0], args[1:]...)
	cmd.Stdout = wpipe
	cmd.Stderr = wpipe
	if err := cmd.Start(); err != nil {
		wpipe.Close()
		return nil, nil, err
	}
    ...
	errc := make(chan error, 1)
    signal := func(err error) {
		select {
		case errc <- err:
		default:
		}
	}
	go func() {
	retry:
		select {
		case <-time.After(timeout):
			signal(vmimpl.ErrTimeout)
		case <-stop:
			signal(vmimpl.ErrTimeout)
        ...
		cmd.Process.Kill()
		cmd.Wait()
	}()
	return inst.merger.Output, errc, nil
}
MonitorExecution() 主要是从 isnt.Run() 返回的 errc 和 inst.merger.Output 两个管道中中接受和处理数据。errc 有数据代表命令已经中止,根据 err 的类型设置不同的参数调用 extractError(),参数的含义是默认的 crash 类型,extractError() 会尝试从 output 中匹配特定类型 crash 的消息(包括 syz-fuzzer 和 vm),匹配到则返回对应的类型,没有则返回参数的默认类型。outc 也是调用 ContainsCrash 完成类似的从输出匹配 crash 的操作。此外获得 syz-fuzzer 的一些正常运行状态也是在这里。
func (inst *Instance) MonitorExecution(outc <-chan []byte, errc <-chan error,
    for {
        select {
        case err := <-errc:
            switch err {
            case nil:
                crash := ""
                if mon.exit&ExitNormal == 0 {
                    crash = lostConnectionCrash
                }
                return mon.extractError(crash)
            case ErrTimeout:
                if mon.exit&ExitTimeout == 0 {
                    return mon.extractError(timeoutCrash)
                }
                return nil
            default:
                if mon.exit&ExitError == 0 {
                    crash = lostConnectionCrash
                }
                return mon.extractError(crash)
            }
        case out, ok := <-outc:
            if !ok {
                outc = nil
                continue
            }
            if bytes.Contains(mon.output[lastPos:], executingProgram1) ||
				bytes.Contains(mon.output[lastPos:], executingProgram2) {
				lastExecuteTime = time.Now()
			}
            if reporter.ContainsCrash(mon.output[mon.matchPos:]) {
                return mon.extractError("unknown error")
            }
            ...
        case <-ticker.C:
            if time.Since(lastExecuteTime) > inst.timeouts.NoOutput {
                return mon.extractError(noOutputCrash)
            }
        case <-Shutdown:
            return nil
        }
    }
}
一旦 syz-fuzzer 运行结束或者 vm 崩溃等原因导致 MonitorExecution() 返回,其返回的 report 就会一路通过 runInstanceInner() -> runInstance() 返回到 vmLoop() 中,最终被调用 mgr.saveCrash() 保存。
syz-manager <— syz-fuzzer
syz-fuzzer 用于和 syz-manager 通信的 RPC 服务在 runManager() 中调用 startRPCServer() 初始化,依靠 golang 自带的 rpc 模块实现。主要有以下功能(之后补充说明):
- Connect
- rotateCorpus
- selectInputs
- Check
- NewInput
- Poll
- shutdownInstance
syz-fuzzer <—> syz-executor
| 不同编译时的宏定义,会导致 syz-executor 有很大差别的行为,这里仅讨论默认配置的情况。 |
整体结构上来讲,syz-fuzzer 主要通过 Fuzzer 结构体来管理当前虚拟机上的 fuzz 进程,整体类似生产者消费者,字段 Fuzzer.procs 指向了 process 数组,一个 process 代表了一个 worker,会不停从 Fuzzer.workQueue 尝试获取 work。注意 Proc 字段 env 指向了一个实例 command,这个其实相当于 syz-fuzzer 和 syz-executor 建立的 session,控制 syz-executor 执行 syscall,以及数据交换都是基于这个实例。(事实上限于对 syzkaller 的认识有限,我并不总能理解这些结构体层级的设计理念,不过很多时候只关心部分实现就够了不是吗)
                                            +-----------------------------+         +---------------------+
                                            | type Proc struct {          |    +--->+ type Env struct {   |     +-----------------------+
  +--------------------------------+   +--->+  fuzzer            *Fuzzer  |    |    |  cmd       *command +---->+ type command struct { |
  | type Fuzzer struct {           |   |    |  pid               int      |    |    |  pid       int      |     |  pid      int         |
  |  config            *ipc.Config |   |    |  env               *ipc.Env +----+    |  config    *Config  |     |  config   *Config     |
  |  procs             []*Proc     +<--+    |  ...                        |         |  ...                |     |  cmd      *exec.Cmd   |
  |  workQueue         *WorkQueue  |   |    | }                           |         | }                   |     |  inrp     *os.File    |
  |  corpus       []*prog.Prog     |   |    +-----------------------------+         +---------------------+     |  outwp    *os.File    |
  |  ...                           |   |                                                                        |  outmem   []byte      |
  | }                              |   |                                                                        |  ...                  |
  +--------------------------------+   |    +-----------------------------+                                     |  handshake()          |
                                       |    | type Proc struct {          |                                     |  exec()               |
                                       +--->+  fuzzer            *Fuzzer  |                                     | }                     |
                                            |  pid               int      |                                     +-----------------------+
                                            |  env               *ipc.Env |
                                            |  ...                        |
                                            | }                           |
                                            +-----------------------------+
main() 首先会做很多初始化工作,例如解析参数,创建 RpcClient,同步 syz-manager 等。然后会进入一个 for 循环,负责生成指定个数的 fuzzer processes。首先调用 newProc() 来生成 proc 实例,然后通过调用 proc.loop() 进入每个 proc 的 fuzz 主循环。
func main() {
	var (
		flagName    = flag.String("name", "test", "unique name for manager")
		flagOS      = flag.String("os", runtime.GOOS, "target OS")
		...
	)
	...
	if err := manager.Call("Manager.Connect", a, r); err != nil {
		log.Fatalf("failed to connect to manager: %v ", err)
	}
	...
	fuzzer := &Fuzzer{
		config:                   config,
		workQueue:                newWorkQueue(*flagProcs, needPoll),
		...
	}
	...
	log.Logf(0, "starting %v fuzzer processes", *flagProcs)
	for pid := 0; pid < *flagProcs; pid++ {
		proc, err := newProc(fuzzer, pid)
		if err != nil {
			log.Fatalf("failed to create proc: %v", err)
		}
		fuzzer.procs = append(fuzzer.procs, proc)
		go proc.loop()
	}

	fuzzer.pollLoop()
}

func newProc(fuzzer *Fuzzer, pid int) (*Proc, error) {
	env, err := ipc.MakeEnv(fuzzer.config, pid)
    ...
	proc := &Proc{
		fuzzer:            fuzzer,
		pid:               pid,
        ...
	}
	return proc, nil
}

func MakeEnv(config *Config, pid int) (*Env, error) {
	var inf, outf *os.File
	var inmem, outmem []byte
	if config.UseShmem {
		inf, inmem, err = osutil.CreateMemMappedFile(prog.ExecBufferSize)
		outf, outmem, err = osutil.CreateMemMappedFile(outputSize)
        ...
	}
	env := &Env{
		in:      inmem,
		out:     outmem,
        ...
	}
    ...
	return env, nil
}
概括地说 proc.loop() 就是一个 while 循环不断从 workQueue 中获取 work 然后执行对应的 fuzz 阶段,如果没有获取到,则会选择生成种子,或者从当前 corpus 中突变。细节流程暂不关心,本文主要关注 syz-fuzzer 和 syz-executor 的管理和通信方式的实现。proc.loop() 中需要执行样本的话就会调用 proc.execute() 来启动 syz-executor 执行具体的样本。
func (proc *Proc) loop() {
	for i := 0; ; i++ {
		item := proc.fuzzer.workQueue.dequeue()
		if item != nil {
			switch item := item.(type) {
			case *WorkTriage:
				proc.triageInput(item)
			case *WorkCandidate:
				proc.execute(proc.execOpts, item.p, item.flags, StatCandidate)
            ...
			}
			continue
		}

		ct := proc.fuzzer.choiceTable
		fuzzerSnapshot := proc.fuzzer.snapshot()
		if len(fuzzerSnapshot.corpus) == 0 || i%generatePeriod == 0 {
			// Generate a new prog.
			p := proc.fuzzer.target.Generate(proc.rnd, prog.RecommendedCalls, ct)
			proc.execute(proc.execOpts, p, ProgNormal, StatGenerate)
		} else {
			// Mutate an existing prog.
			p := fuzzerSnapshot.chooseProgram(proc.rnd).Clone()
			p.Mutate(proc.rnd, prog.RecommendedCalls, ct, fuzzerSnapshot.corpus)
			proc.execute(proc.execOpts, p, ProgNormal, StatFuzz)
		}
	}
}
经过 proc.execute() -> proc.executeRaw() -> proc.env.Exec() 来尝试启动 syz-executor。在 proc.env.Exec() 中,首先会调用 p.SerializeForExec() 将程序序列化为 executor 可以解析的形式到 env.in 中,env.in 是在 MakeEnv 时创建的 SHM。如果 cmd 为空,则首先调用 makeCommand() 创建 env.cmd,command 结构体可以看作是 syz-fuzzer 和 syz-executor 的 session(如果没有启用 FORK_SERVER 则这个 session 会在每次执行完后清除,反之则会一直存在,只需要在 process 第一次执行时创建)。之后通过这个 session 调用 env.cmd.exec() 控制 syz-executor 执行具体的系统调用,最后 parseOutput() 对结果进行解析。
func (proc *Proc) execute(execOpts *ipc.ExecOpts, p *prog.Prog, flags ProgTypes, stat Stat) *ipc.ProgInfo {
	info := proc.executeRaw(execOpts, p, stat)
    ...
}

func (proc *Proc) executeRaw(opts *ipc.ExecOpts, p *prog.Prog, stat Stat) *ipc.ProgInfo {
	for try := 0; ; try++ {
		output, info, hanged, err := proc.env.Exec(opts, p)
		if err != nil {
			if try > 10 {
				log.Fatalf("executor %v failed %v times:\n%v", proc.pid, try, err)
			}
            ...
		}
		log.Logf(2, "result hanged=%v: %s", hanged, output)
		return info
	}
}

func (env *Env) Exec(opts *ExecOpts, p *prog.Prog) (output []byte, info *ProgInfo, hanged bool, err0 error) {
    // Copy-in serialized program.
    rogSize, err := p.SerializeForExec(env.in)
    var progData []byte
	if !env.config.UseShmem {
		progData = env.in[:progSize]
	}
    ...
    if env.cmd == nil {
        ...
        env.cmd, err0 = makeCommand(env.pid, env.bin, env.config, env.inFile, env.outFile, env.out, tmpDirPath)
    }
    output, hanged, err0 = env.cmd.exec(opts, progData)

    info, err0 = env.parseOutput(p)

    if !env.config.UseForkServer {
        env.cmd.close()
        env.cmd = nil
    }
    return
}
makeCommand() 主要也是通过 osutil.Command() 来启动 syz-executor(这里的 Command() 的是指在 shell 中执行的命令,注意与作为 session 的 command 结构体作区分)。这里创建了三个管道对 Command 的 stdin,stdout 和 stderr 进行了替换。替换 stdin,stdout 的管道主要是用来交换命令;替换 stderr 的主要是用来输出一些错误信息(后续好像不通过解析 stderr 信息的方式来判断是否发生错误,是通过直接看读写操作是否能成功完成判断进程是否异常退出)。此外,如果设置了 SYZ_EXECUTOR_USES_SHMEM 则会创建两个文件作为 shm,并通过 cmd.ExtraFiles 传递文件描述符,用来交换 syscall 的执行所需参数和执行结果。因为默认开了 fork_server 所以在 syz-executor 启动后会首先调用 handshake() 建立连接,可以看到 handshake() 内部是通过 stdin 和 stdout 来交换的数据。
func makeCommand(pid int, bin []string, config *Config, inFile, outFile *os.File, outmem []byte,
    c := &command{
        pid:     pid,
        config:  config,
        timeout: timeout,
        dir:     dir,
        outmem:  outmem,
    }

    // Output capture pipe.
    rp, wp, err := os.Pipe()
    // executor->ipc command pipe.
    inrp, inwp, err := os.Pipe()
    c.inrp = inrp
    // ipc->executor command pipe.
    outrp, outwp, err := os.Pipe()
    c.outwp = outwp

    ...
    cmd := osutil.Command(bin[0], bin[1:]...)
    if inFile != nil && outFile != nil {
        cmd.ExtraFiles = []*os.File{inFile, outFile}
    }
    cmd.Dir = dir
    cmd.Stdin = outrp
    cmd.Stdout = inwp
    if config.Flags&FlagDebug != 0 {
        close(c.readDone)
        cmd.Stderr = os.Stdout
    } else {
        cmd.Stderr = wp
        ...
    }
    if err := cmd.Start(); err != nil {
        return nil, fmt.Errorf("failed to start executor binary: %v", err)
    }
    c.cmd = cmd

    if c.config.UseForkServer {
        if err := c.handshake(); err != nil {
            return nil, err
        }
    }
    tmp := c
    return tmp, nil
}

func (c *command) handshake() error {
	req := &handshakeReq{
		magic: inMagic,
		flags: uint64(c.config.Flags),
		pid:   uint64(c.pid),
	}
	reqData := (*[unsafe.Sizeof(*req)]byte)(unsafe.Pointer(req))[:]
	if _, err := c.outwp.Write(reqData); err != nil {
		return c.handshakeError(fmt.Errorf("failed to write control pipe: %v", err))
	}

	read := make(chan error, 1)
	go func() {
		reply := &handshakeReply{}
		replyData := (*[unsafe.Sizeof(*reply)]byte)(unsafe.Pointer(reply))[:]
		if _, err := io.ReadFull(c.inrp, replyData); err != nil {
			read <- err
			return
		}
		if reply.magic != outMagic {
			read <- fmt.Errorf("bad handshake reply magic 0x%x", reply.magic)
			return
		}
		read <- nil
	}()
	// Sandbox setup can take significant time.
	timeout := time.NewTimer(time.Minute * c.config.Timeouts.Scale)
	select {
	case err := <-read:
		timeout.Stop()
		if err != nil {
			return c.handshakeError(err)
		}
		return nil
	case <-timeout.C:
		return c.handshakeError(fmt.Errorf("not serving"))
	}
cmd.exec() 负责控制一次样本的执行,首先通过 excutor 的 stdin 发送执行 syscall 的命令给 syz-executor,由于默认启用了 SHM 来传输 ProgData 这里的 progData 会为 nil(已经在 SerializeForExec() 中写入 SHM,Sesyz-executor 会直接从 mmap 的 SHM 中读取 ProgData)。然后期望收集 syz-executor 返回的 executeReply 和 callReply,由于开启了 SHM,这里正常只会返回 executeReply,callReply 通过 SHM(out) 进行传递。
func (c *command) exec(opts *ExecOpts, progData []byte) (output []byte, hanged bool, err0 error) {
	req := &executeReq{
		magic:            inMagic,
		progSize:         uint64(len(progData)),
        ...
	}
	reqData := (*[unsafe.Sizeof(*req)]byte)(unsafe.Pointer(req))[:]
	if _, err := c.outwp.Write(reqData); err != nil {
		output = <-c.readDone
		err0 = fmt.Errorf("executor %v: failed to write control pipe: %v", c.pid, err)
		return
	}
	if progData != nil {
		if _, err := c.outwp.Write(progData); err != nil {
			output = <-c.readDone
			err0 = fmt.Errorf("executor %v: failed to write control pipe: %v", c.pid, err)
			return
		}
	}
	// At this point program is executing.
	for {
		reply := &executeReply{}
		replyData := (*[unsafe.Sizeof(*reply)]byte)(unsafe.Pointer(reply))[:]
		if _, err := io.ReadFull(c.inrp, replyData); err != nil {
			break
		}
		if reply.magic != outMagic {
			fmt.Fprintf(os.Stderr, "executor %v: got bad reply magic 0x%x\n", c.pid, reply.magic)
			os.Exit(1)
		}
		if reply.done != 0 {
			exitStatus = int(reply.status)
			break
		}
		callReply := &callReply{}
		callReplyData := (*[unsafe.Sizeof(*callReply)]byte)(unsafe.Pointer(callReply))[:]
		if _, err := io.ReadFull(c.inrp, callReplyData); err != nil {
			break
		}
		if callReply.signalSize != 0 || callReply.coverSize != 0 || callReply.compsSize != 0 {
			// This is unsupported yet.
			fmt.Fprintf(os.Stderr, "executor %v: got call reply with coverage\n", c.pid)
			os.Exit(1)
		}
		copy(outmem, callReplyData)
		outmem = outmem[len(callReplyData):]
		*completedCalls++
	}
    ...
	return
}
syz-executor
main() 函数开始是一系列配置,然后会根据提供的 shm_fd 来映射两块内存负责读入执行 syscall 所需参数和写回 call_reply。接着等待 syz-fuzzer 发出的 handshake 请求,之后就调用 do_sandbox_none() 来执行后续的操作。
int main(int argc, char** argv)
{
    ...
#if SYZ_EXECUTOR_USES_SHMEM
	if (mmap(&input_data[0], kMaxInput, PROT_READ, MAP_PRIVATE | MAP_FIXED, kInFd, 0) != &input_data[0])
		fail("mmap of input file failed");
	void* preferred = (void*)(0x1b2bc20000ull + (1 << 20) * (getpid() % 128));
	output_data = (uint32*)mmap(preferred, kMaxOutput,
				    PROT_READ | PROT_WRITE, MAP_SHARED | MAP_FIXED, kOutFd, 0);
	if (output_data != preferred)
		fail("mmap of output file failed");

    ...
#if SYZ_EXECUTOR_USES_FORK_SERVER
	receive_handshake();
    ...
	int status = 0;
	if (flag_sandbox_none)
		status = do_sandbox_none();
    ...
	doexit(status);
	// Unreachable.
	return 1;
}
do_sandbox_none() 内有一个不明所以的 fork()(写了原因但没仔细看),然后就进入 loop() 函数。对于没有启用 FORK_SERVER 的 executor 来说,loop() 内部就单纯执行了一次 execute_one()。启用了 FORK_SERVER 的 loop() 就是循环地调用 receive_execute() 从 syz-fuzzer 接受 execute_req,然后 fork 一个子进程来完成通过 execute_one() 来完成一次样本的执行。执行完毕后调用 reply_execute() 来回传 execute_reply 数据。
static int do_sandbox_none(void)
{
	// CLONE_NEWPID takes effect for the first child of the current process,
	// so we do it before fork to make the loop "init" process of the namespace.
	// We ought to do fail here, but sandbox=none is used in pkg/ipc tests
	// and they are usually run under non-root.
	// Also since debug is stripped by pkg/csource, we need to do {}
	// even though we generally don't do {} around single statements.
	if (unshare(CLONE_NEWPID)) {
		debug("unshare(CLONE_NEWPID): %d\n", errno);
	}
	int pid = fork();
	if (pid != 0)
		return wait_for_loop(pid);
    ...
	loop();
	doexit(1);
}


#if SYZ_EXECUTOR_USES_FORK_SERVER
void loop(void)
{
	reply_handshake();
	int iter = 0;
	for (;; iter++) {
		receive_execute();
		int pid = fork();
		if (pid < 0)
			fail("clone failed");
		if (pid == 0) {
			execute_one();
			doexit(0);
		}
		debug("spawned worker pid %d\n", pid);
		int status = 0;
		uint64 start = current_time_ms();
		for (;;) {
			if (waitpid(-1, &status, WNOHANG | WAIT_FLAGS) == pid)
				break;
            ...
		}
        reply_execute(0)
        ...
	}
}
#else
void loop(void)
{
	execute_one();
}
#endif
因为一个样本 program 可能由多个 syscall 组成序列,所以用 for 循环来接受执行所有的系统调用(严格来说这里并不是一次迭代执行一个 syscall,读入一个参数就会执行一次迭代,通过 call_num 来判断是否需要执行 syscall)。
读取完一个 syscall 所需参数,做一些必要的检查过后就通过 schedule_call() 来创建一个线程,线程内部通过调用 execute_call() 完成 syscall 的执行(如果没有设置 flag_threaded,则会在当前线程调用 execute_call()。handle_completion() 将执行结果 syscall_reply 回传给 syz-fuzzer(),内部有点复杂,这里不再展开。
void execute_one()
{
	for (;;) {
		uint64 call_num = read_input(&input_pos);
		if (call_num == instr_eof)
			break;
		if (call_num == instr_copyin) {
			char* addr = (char*)read_input(&input_pos);
			uint64 typ = read_input(&input_pos);
			switch (typ) {
			case arg_const: {
			}
			case arg_result: {
			}
            ...
			}
			default:
				failmsg("bad argument type", "type=%llu", typ);
			continue;
		}
        ...
		// Normal syscall.
		thread_t* th = schedule_call(call_index++, call_num, colliding, copyout_index,
					     num_args, args, input_pos);

		if (colliding && (call_index % 2) == 0) {
		} else if (flag_threaded) {
			if (flag_debug && timeout_ms < 1000)
				timeout_ms = 1000;
			if (event_timedwait(&th->done, timeout_ms))
				handle_completion(th);
			}
		} else {
			// Execute directly.
			if (th != &threads[0])
				fail("using non-main thread in non-thread mode");
			event_reset(&th->ready);
			execute_call(th);
			event_set(&th->done);
			handle_completion(th);
		}
	}
    ...
}
execute_call() 内部调用 execute_syscall() 调用 syscall 真正执行系统调用,并将结果作对应记录。至此大致完成从 syz-manager 出发到 syscall 执行的过程。
void execute_call(thread_t* th)
{
    ...
	NONFAILING(th->res = execute_syscall(call, th->args));
	th->reserrno = errno;
	if ((th->res == -1 && th->reserrno == 0) || call->attrs.ignore_return)
		th->reserrno = EINVAL;
    ...
}

intptr_t execute_syscall(const call_t* c, intptr_t a[kMaxArgs])
{
	if (c->call)
		return c->call(a[0], a[1], a[2], a[3], a[4], a[5], a[6], a[7], a[8]);
	return syscall(c->sys_nr, a[0], a[1], a[2], a[3], a[4], a[5]);
}